Getting Started
Modular Pipeline Approach
The design of the pipeline aims at interfacing a variety of general and specific analysis and processing steps in a flexible modular manner. Hence, the pipeline is able to adapt to diverse types of data (e.g., electrical ECoG, or optical calcium imaging recordings) and to different analysis questions. This makes the analyses a) more reproducible and b) comparable among each other since they rely on the same stack of algorithms and any differences in the processing are fully transparent. The individual processing and analysis steps, Blocks, are organized in sequential Stages. Following along the stages, the analysis becomes more specific but also allows to branch off at after any stage, as each stage yields useful intermediate results and is autonomous so that it can be reused and recombined. Within each stage, there is a collection of blocks from which the user can select and arrange the analysis via a config file. Thus, the pipeline can be thought of as a curated database of methods on which an analysis can be constructed by drawing a path along the blocks and stages.
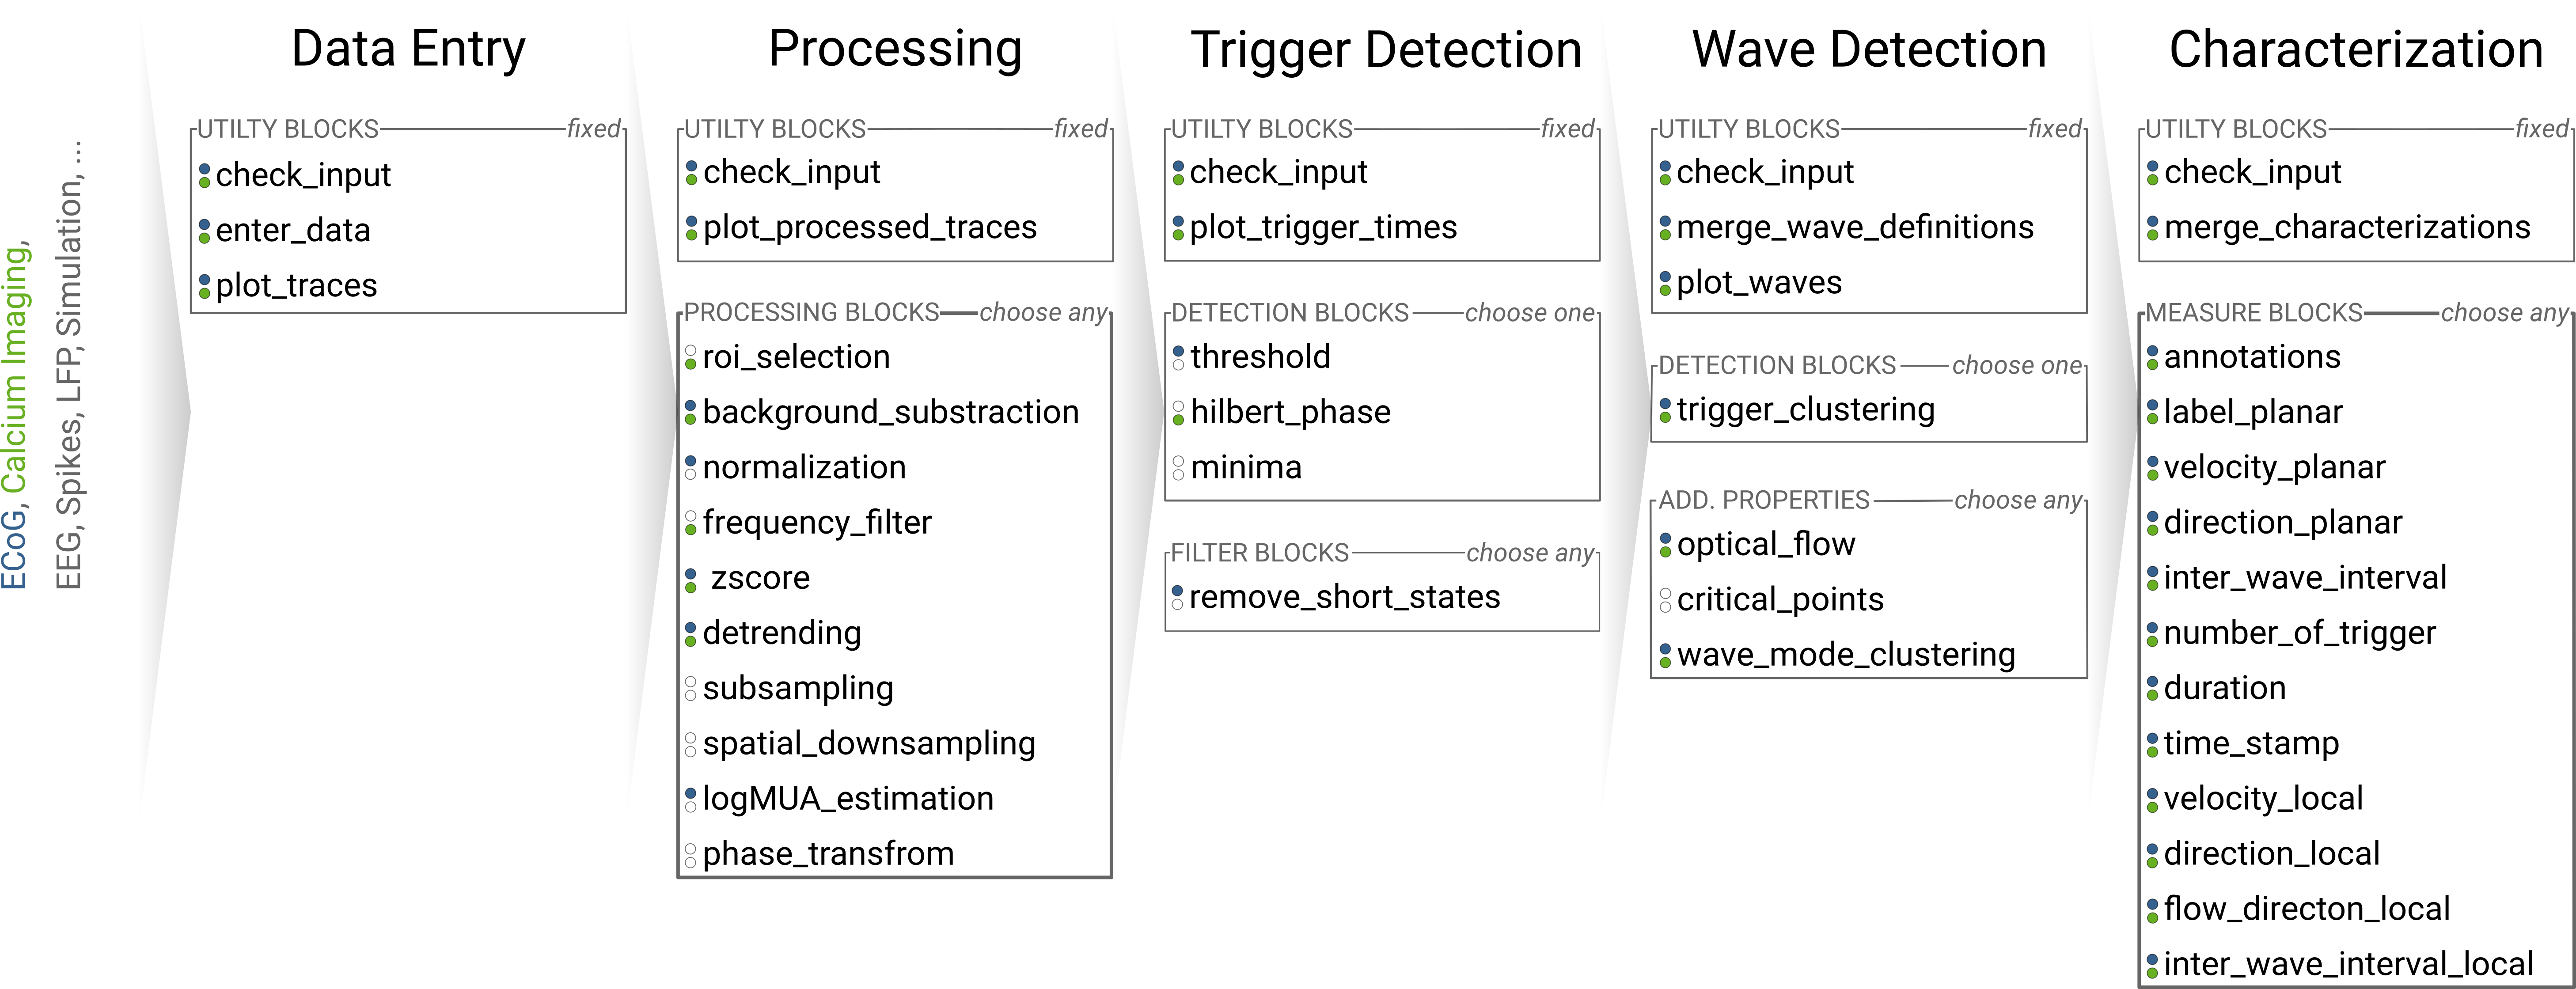
Figure: Pipeline Structure. Each column represents a stage and each bullet represents a block. The green and blue markings indicate a exemplary block selections for a ECoG and a calcium imaging dataset.
Installation
Online execution via EBRAINS will follow.
Installation with PyPi
pip install cobrawap
Manual Installation For Developers
For working on the source code, it is recommended to fork the Cobrawap repository from Github, and clone it or set it as a submodule to another project repository.
Create a fork in your github domain of the upstream location github.com/NeuralEnsemble/cobrawap and clone the repository to your local machine (git clone git@github.com:<your-github-handle>/cobrawap.git).
Then use pip to install the module from your local directory in an editable mode. .. code-block:: bash
pip install -e <path-to-cobrawap-directory>
Pipeline Setup
Initialization
See also Command Line Interface > init.
cobrawap init
This will prompt the setting of path information for an output directory of the pipeline results and for a config directory where the pipeline config files are stored. Optionally, these paths can be directly passed to the init command with --output_path and --config_path. These settings will be stored in ~/.cobrawap/config.
If the specified config directory is empty, this step will also create template config files for each stage and a template dataset loading script for the initial stage.
Creating Set of Configurations for a Dataset
See also Command Line Interface > create.
cobrawap create
This will prompt the setting of a profile name and optionally a parent profile name from which to copy the parameter presets. The parent profile name will be prepended to the profile name (see Config Profiles). Optionally, these names can be directly passed to the create command with --profile and --parent_profile.
The profile and parent name will be used to create correspondingly named config files for each stage: config_<parent>_<profile>.yaml for the first stage and config_<parent>.yaml for all other stages.
For specifying the data entry into the pipeline create also asks for the path to the dataset and a name for the corresponding loading script. This information can also be passed to the create command with --data_path and --loading_script_name.
Both information are written into the corresponding config file of the first stage. Furthermore, a template loading script is created in <config_path>/stage01_data_entry/scripts/ which has to be adapted to load the specific dataset.
A detailed guide to set up the data entry can be found in the stage01 README.
Adding a Configuration Profile
See also Command Line Interface > add_profile.
cobrawap add_profile
This will prompt the setting of a profile and parent profile name just as for cobrawap create. Additionally, it requires to specify the stages for which to create new config files (can be directly passed with --stages).
Consequently, this will create new config files config_<parent>_<profile>.yaml for the selected stages, copying the parameter presents from config_<parent>.yaml.
If the stage selection includes the first stage, this will again prompt the additional setting of a --data_path and --loading_script_name as for cobrawap create.
Running the Pipeline
Running the Full Pipeline
See also Command Line Interface > run.
cobrawap run
This will prompt the setting of a profile to be executed (can be directly passed with --profile).
The command line arguments can be extended with the specification of config parameters (in the format PARAMETER=value) that will overwrite the corresponding parameter values in the config files. Any further command line arguments will be passed to snakemake, see the snakemake documentation for available command line arguments.
Running a Single Stage
See also Command Line Interface > run_stage.
cobrawap run_stage
The behavior is identical to cobrawap run, except for the additional specification of a stage, either prompted or directly with --stage.
Running a Single Block
See also Command Line Interface > run_block.
cobrawap run_block
This command allows to execute the python script of a specific block. The block should be specified as <stage_name>.<block_name> and can be passed with --block. Any additional command line arguments are passed to the script.
To display the help text of the block script add --block_help.
Organization
Snakefiledefines how the stages are executed within the full pipelineconfigs/contains global config filesconfig.yamldefines the global parameter settings
settings.pydefines theoutput_pathandconfigs_dirscripts/contains general utility scriptsstageXY/each stage is a separate folderSnakefiledefines the blocks (=rules) and organizes their interactionscripts/contains the analysis and plotting scripts (~1 script per block)configs/contains the parameter settings for this stageconfig_{profile}.yaml… with different settings for different profiles
READMEdescribes the stage’s functionality

Figure: Folder Structure. The pipeline structure is reflected in the organization of the folders, here showing an excerpt of two stages and example blocks. Stages and blocks are folders and subfolders in the pipeline directory (middle row); the output of individual stages and blocks is stored with the same hierarchy of folders and subfolders (bottom row); the local configuration can act as an overlay to define config files and loading scripts (top row).
Configuration
Config Files
There is one config file per stage, and one additional top-level config file that selects the stages and defines pipeline-wide parameters.
All config files are given as templates. So, in order to get started you need to copy/rename config_template.yaml to config.yaml in the corresponding folders, and edit to your needs.
See pipeline config template: configs/config_template.yaml.
Local Config Directory
Similarly, you need to rename settings_template.py to settings.py and edit the containing output_path to fit your local system.
In the setting file, you can also optionally set a configs_dir path to define an alternative directory containing the config files. This alternative config directory mirrors the stage folder structure of the pipeline and can be used to configure the pipeline for specific projects without touching the cobrawap folder itself.
Config Profiles
Config profiles make it possible to group specific parameter configurations for different datasets or applications across stages, and easily switch between them. You can set the PROFILE parameter in the top-level config file (or via the command line when running the pipeline). The corresponding pipeline output will be stored in {output_path}/{profile}/, and for each stage the specific config file {stage}/configs/config_{profile}.yaml is used.
To reduce redundancy and the number of config files, profiles use a hierachical naming convention where each subgroup is seperated with an underscore _, for example, config_ecog_session1_trial7.yaml. When a stage does not contain this exact file name, it falls back onto the parent group (config_ecog_session1.yaml) and when it also doesn’t exist onto its parent group (config_ecog.yaml) and so on. Thus, config specialization is only applied in the stages where it is needed. Furthermore, you can add variants to the profile name with a | delimiter to additionally switch analysis types, for example, config_caimg_session1|subsampled.yaml.
The selection order is the following:
config_some_profile|variant.yaml
config_some|variant.yaml
config|variant.yaml
config_some_profile.yaml
config_some.yaml
config.yaml
Config Priority
stage config < pipeline config < command line config
Generally, all parameters are specified in the corresponding stage config files. However, any parameters can also be set in the top-level pipeline config. These then have priority and overwrite the values in all stages. This is useful, in particular, to specify the file formats (NEO_FORMAT, PLOT_FORMAT) and plotting parameters (PLOT_TSTART, PLOT_TSTOP, PLOT_CHANNELS). Additionally, you can set parameters via the command line when executing the pipeline with the flag --config. This is especially recommended for setting the profile (e.g. --config PROFILE="ecog_session1_trial7|highbeta").
Execution
Cobrawap relies on the functionality of Snakemake to execute the pipeline, and therefore supports its additional features and command line arguments (see its documentation).
Running The Full Pipeline
Make sue all paths are set (settings.py) and the pipeline and stage configs are specified.
Then navigate to the cobrawap/pipeline/.
When PROFILE is set accordingly in the pipeline config, the execution is a simple snakemake call:
snakemake --cores=1
Otherwise, the profile (and other parameters) can be set directly via the command line:
snakemake --config PROFILE={profile} --cores=1
Running Specific Stages
Navigate to the stage folder cobrawap/pipeline/<stage>/. As each stage is a subworkflow it can be executed with the same snakemake calls as the full pipline. However, you need to manually specify the config file and stage input:
snakemake --configfile='configs/config_{profile}.yaml' --config PROFILE={profile} STAGE_INPUT=/path/to/stage/input/file --cores=1
Running Specific Blocks
Each block is represented by a snakemake rule. To run a specific rule you can explicitly request its output file:
snakemake /path/to/specific/file --configfile='configs/config_{profile}.yaml' --config PROFILE={profile} STAGE_INPUT=/path/to/stage/input/file --cores=1
Keep in mind that snakemake keeps track of the timestamps of scripts, input, and output files. So, a rule will only be run again if any of its inputs has changed, and if something in the creation of the input changed this might also trigger the re-execution of other blocks.
Interfaces
Pipeline Inputs
The data input to the pipeline is the input to stage01_data_entry. The path to the data file is given in the config file of this first stage as key-value pair (<data_name>: /path/to/file) in DATA_SETS, and loaded by the custom data entry scripts specified in CURATION_SCRIPT. Additional metadata can be specified in the same config file. For details see the stage01 README.
Pipeline Outputs
The output of the pipeline is the output of all the selected stages. Thus, final result is the output of the final stage, whereas other stage output can be regarded as intermediate results. The file format of data and figures is determined by the parameters NEO_FORMAT and PLOT_FORMAT.
All are stored in {output_path}/{profile} in a folder structure representing the corresponding structure of stages and block (see Figure Folder Structure).
Stage Inputs
The path to the input file for each stage is defined in the config parameter STAGE_INPUT. When executing the full pipeline the stage inputs are automatically set to the outputs (STAGE_OUTPUT) of the previous stage, respectively. Details on the input requirements for each stage are specified in the corresponding stage README files and checked automatically via a check_input block in each stage.
Stage Outputs
The stage output file is stored as {output_path}/{profile}/{STAGE_NAME}/{STAGE_OUTPUT}/, with STAGE_NAME, and STAGE_OUTPUT taken from the corresponding config file and output_path from settings.py.
Details on the output content and format for each stage are specified in the corresponding stage README files.
Block Inputs
Input dependencies to blocks are handled by the corresponding rule in the Snakefile and are arranged according on the mechanics of the respective stage.
Block Outputs
All output from blocks (data and figures) is stored in {output_path}/{profile}/{STAGE_NAME}/{block_name}/.